 |
|
Pictures are arranged from west to east. Click here to show the route.
;)
| PTH 4 ends at PTH 9/9A north west of Selkirk. Click here for PTH 9 images and here for PTH 9A images. | ||||
| Location | Description | Photo
| ||
| City of Selkirk |
Eastbound view showing the first eastbound marker. This marker was replaced in the summer of 2009, as shown below, and replaced with a smaller marker.  Photograph taken in May 2009. |
;) |
||
| City of Selkirk |
Eastbound view showing the first “warthog”-style eastbound marker. Photograph taken in October 2009. |
;) |
||
| City of Selkirk |
Westbound view at the junction of PTH 9/9A. Photograph taken in May 2009. |
;) |
||
| City of Selkirk |
Westbound view at the junction of PTH 9/9A showing a closeup of the overhead signage. Photograph taken in May 2009. |
;) |
||
| City of Selkirk |
Eastbound view north of the junction of PTH 9/9A. Photograph taken in May 2009. |
;) |
||
| RM of St. Andrews |
Eastbound view north of Selkirk. Photograph taken in May 2009. |
;) |
||
| RM of St. Andrews |
Eastbound view approaching the junction of PR 320. Photograph taken in May 2009. |
;) |
||
| RM of St. Andrews |
Westbound view west of the turnoff for PR 320. Photograph taken in May 2009. |
;) |
||
| RM of St. Andrews |
Eastbound view at the turnoff for PR 320. Photograph taken in May 2009. |
;) |
||
| RM of St. Andrews |
The approach to PTH 4 from PR 320. Photograph taken in May 2010. |
;) |
||
| RM of St. Andrews |
Approaching PR 320 from PTH 4. Photograph taken in August 2011. |
;) |
||
| RM of St. Andrews |
The approach to PTH 4 west from PR 320. Photograph taken in May 2009. |
;) |
||
| RM of St. Andrews |
The approach to PTH 4 east from PR 320. Photograph taken in May 2009. |
;) |
||
| RM of St. Andrews |
Westbound view at the turnoff for PR 320. Photograph taken in May 2009. |
;) |
||
| RM of St. Andrews |
Westbound view approaching the turnoff to PR 320. Photograph taken in August 2011. |
;) |
||
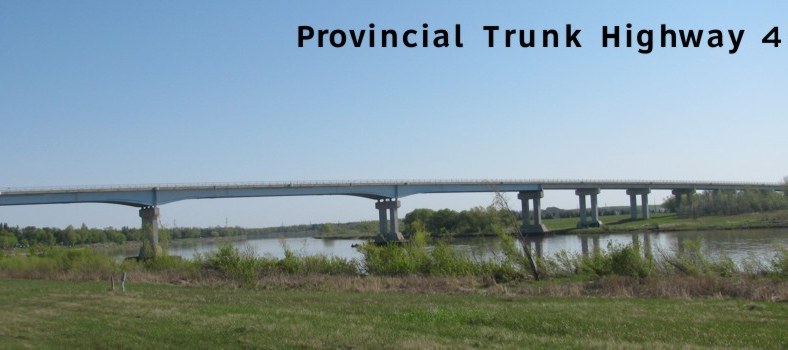
| RM of St. Andrews |
View of the bridge from the PR 320 turnoff. Photograph taken in May 2009. |
;) |
||
| RM of St. Andrews |
View of the bridge from PR 320. Photograph taken in May 2009. |
;) |
||
| RM of St. Andrews |
View of the bridge from PR 320. Photograph taken in May 2009. |
;) |
||
| PTH 4 meets PR 320 north of Selkirk. Click here for PR 320 images. | ||||
| RM of St. Clements |
Westbound view approaching the bridge. Photograph taken in May 2009. |
;) |
||
| RM of St. Clements |
Eastbound view approaching the junction of PR 508. Photograph taken in May 2009. |
;) |
||
| RM of St. Clements |
Eastbound view showing the advance signage for the junction of PR 508. Photograph taken in August 2011. |
;) |
||
| RM of St. Clements |
Eastbound view showing a closeup of the advance signage for the junction of PR 508. Photograph taken in August 2011. |
;) |
||
| RM of St. Clements |
Eastbound view approaching the junction of PR 508. Photograph taken in August 2011. |
;) |
||
| RM of St. Clements |
Westbound view at the junction of PR 508. Photograph taken in August 2011. |
;) |
||
| PTH 4 meets PR 508 north of East Selkirk. Click here for PR 508 images. | ||||
| RM of St. Clements |
Eastbound view past the junction of PR 508. The '4' in the marker is off-center. Photograph taken in August 2011. |
;) |
||
| PTH 4 ends at PTH 59 north of East Selkirk. Click here for PTH 59 images. | ||||
© Curtis Walker. All rights reserved. All pictures used on this site are the property of the respective photographers and are used by permission. No picture may be used without the consent of the respective photographer.
All pictures taken by Curtis Walker unless otherwise noted.